
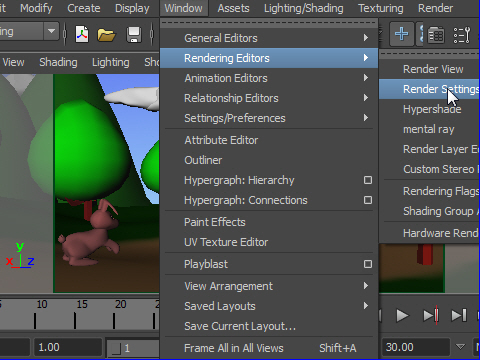
1. To setup rendering, go to
Window > Rendering Editors > Render Settings
レンダリングのセッテイングは
Window > Rendering Editors > Render Settings
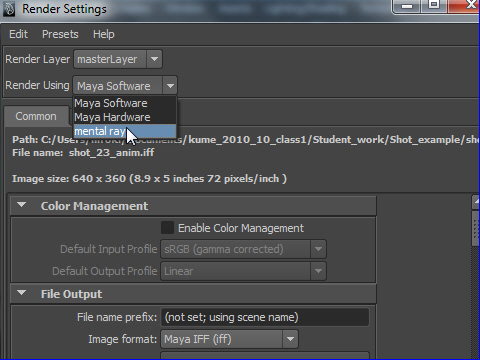
2. Choose mental ray for rendering.
To make realistic images, Mental Ray is much better than Maya Software.
( If you can not find the mental ray option from the Render Settings window, go to Window > Settings/Preferences > Plug-in Manager.
From Plug-in Manager window, find Mayatomr.mll and check both Loaded and Auto load box.)
mental ray を使ってレンダリングします。
リアルな感じを出すにはMaya のレンダリングよりもMental Ray のほうが良いです。
( もし、mental ray のオプションが見つからない場合 は、
Window > Settings/Preferences > Plug-in Manager へ行きます。
次に Plug-in Manager のウィンドウから Mayatomr.mll を見つけ Loaded とAuto loadをチェックマークでオンにします。)
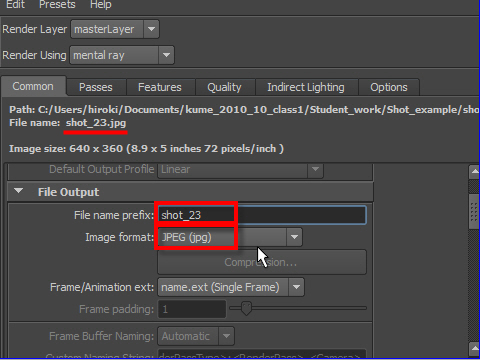
3. Name output images. In this case I will name as shot_23.
Choose image format as JPEG(jpg).
jpg is the most common image format.
レンダリングするイメージの名前をつけます。ここでは shot_23 にします。
image format ( イメージ フォーマット ) をJPEG(jpg) にします。
jpg の画質はそれほど良くありませんが、データが小さく、一般的に使われ ているフォーマットです。
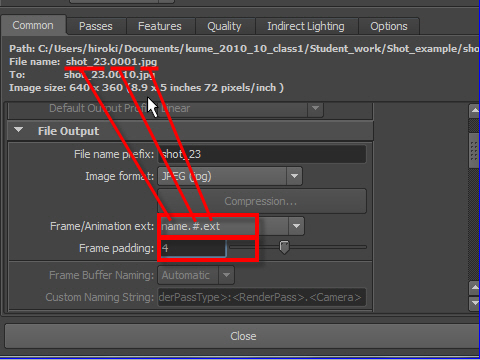
4. We are going to render a sequence of images so each image needs the unique number.
A common naming is name.#.ext
ext is an image type extension. In this case, it is jpg.
We use four digit number so choose 4 from Frame padding option.
Example: shot_23.0001.jpg
何十枚ものイメージをレンダリングするので それぞれのイメージにナンバーが必要です。
一般的な名前の付け方は レンダリング名.4桁の番号.イメージフォーマットです。 つまり name.#.ext を選択します。
Frame padding とは桁数です。 ここでは4桁を使用するので4と入力します。
例) shot_23.0001.jpg
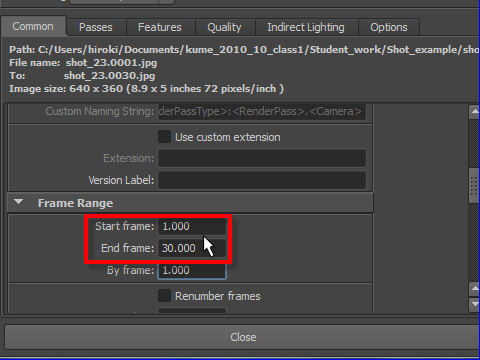
5. Set the start and end frame.
スタートとエンド フレームの数字を入力します。
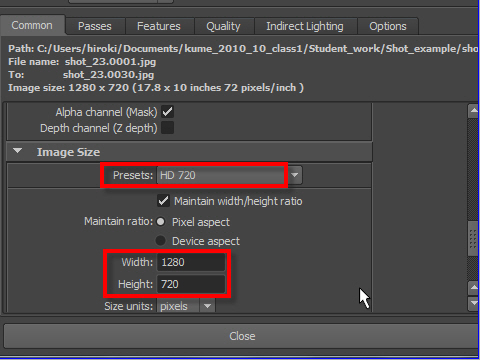
6. Choose HD 720 for the image size ( resolution ) .
The resolution is 1280X720
For the test rendering , use the half size which is 640X 360.
画面の大きさ つまり画質はHD 720 を選択します。
HD 720画質は 横1280 縦720 となります。
初期の レンダリングのテストは半分のサイズの640X 360でも十分です。
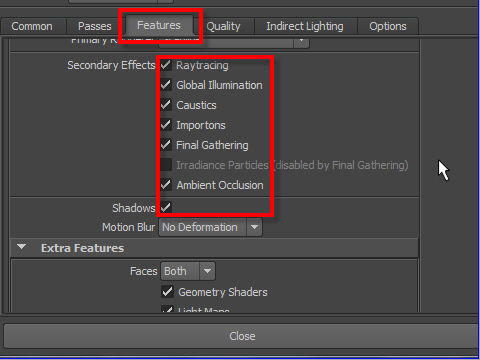
7.Go to Features tab, and assign check mark for the all Secondary Effects.
Features タブへ行き、Secondary Effects のオプションをすべて選択します。
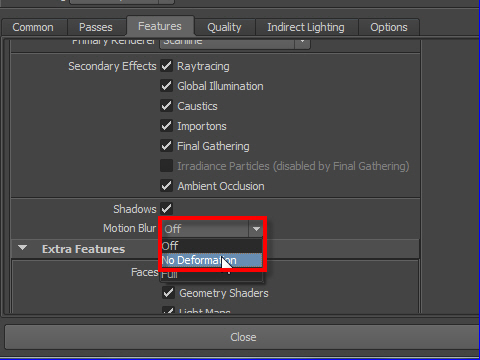
8. Turn on Motion Blur when you have moving objects in your scene.
シーンの中に動く物がある場合は Motion Blur を セットします。
Motion Blur (モーションブラー) とは 物体が動く時に画像がボケる現象です。
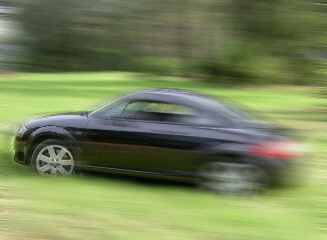
Example of motin blur
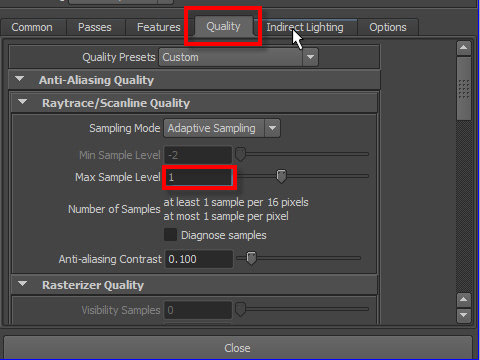
9. Increase Max Sample Level to increase edge quality of objects.
Don't put high number more than you need. It will take longer time to render.
Start from 1 and increase little by little.
Max Sample Level の数値を上げると 面の端のギザギザが小さくなり滑らかな曲面になります。でも あまり上げすぎるとレンダリングに時間がかかるので最初は1 からスタートして徐徐に数値を上げていきます。
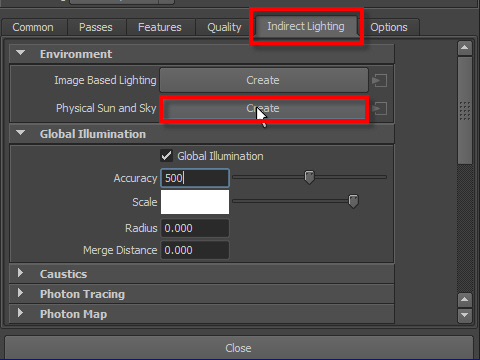
10. To make day light setting, go to Indirect Lighting tab and turn on Physical Sun and Sky.
昼間の太陽の光を表現するには Indirect Lighting タ ブへ行き、Physical Sun and Sky の Create ボタンを押します。
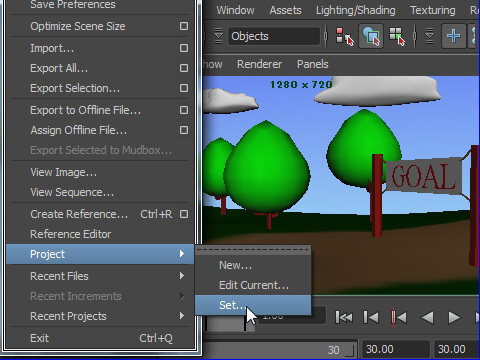
11. Before start rendering, you have to set the directory to save rendered images.
Go to File > Project > Set
Then, choose the directory where you want to save the images.
レンダリングを開始する前に 出来上がったイメージの保存場所を決めます。
File > Project > Set へ 行き、ディレクトリーを設定します。

12. To start rendering, go to Render > Batch Render
レンダリングを開始するには
Render > Batch Render へ 行きます。
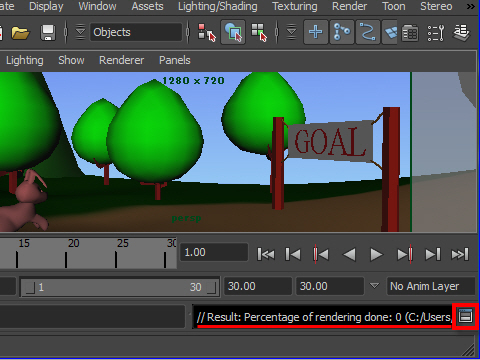
13. Render status will be displayed on the command line on the bottom.
To see more detail, click the icon on the bottom right.
Once the rendering start, it is OK to work on another scene.
The rendering will keep going.
レンダリングの経過は下のコマンド ラインに表示されます。
詳細を見るには右下のアイコンをクリックします。
一度レンダリングが始まればMaya の画面上に他のシーンを持ってきて作業しても問題はありません。レンダリングはそのまま継続されます。
-1-